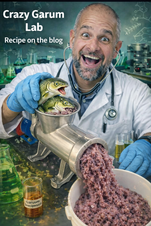
How to Make High-Performance Fermented Fish Liquid at Home
Long before modern bait science, ancient civilizations had already mastered the art of fish preservation and transformation.
The Garum used by Roman legionaries was not only a way to store fish for months—it was a powerful, nutrient-dense liquid obtained through enzymatic breakdown. Today, similar processes are still widely used across Southeast Asia to produce fish sauces of exceptional nutritional and sensory value.
What many anglers still underestimate is that this same process produces one of the most effective natural carp attractors ever discovered.
And the best part?
You can easily make it at home—at extremely low cost.
Raw Materials: Flexibility Is Key (But One Element Is Critical)
You are not limited to sardines or anchovies.
In fact, any type of fish can be used:
-
Sea fish
-
Freshwater fish
-
Small bait fish
-
Even low-value or discarded fish
👉 The real key factor is the presence of entrails.
The internal organs naturally contain proteolytic enzymes, which are essential to trigger and sustain the hydrolysis process. Without them, the transformation is dramatically slower and less effective.
A Smart Approach: Use Fish Waste
From a technical and economic perspective, one of the most efficient solutions is to use:
-
Heads
-
Skins
-
Frames
-
Entrails
These by-products are often available at very low cost (or even free) from fish markets and provide excellent enzymatic and nutritional value.
Ingredients
-
3 kg of whole fish (uncleaned, with entrails)
-
1 kg of sea salt (exactly 1/3 of fish weight)
-
A glass container with lid (leave some headspace)
The Process: Controlled Enzymatic Breakdown
-
Cut the fish into small pieces
-
Alternate layers of fish and salt inside the container
-
Finish with a top layer of salt
-
Close the container
Temperature Matters
-
Ideal: around 30°C
-
Minimum: never below 20°C
Below this threshold, enzymatic activity slows down significantly or stops altogether.
Accelerating the Process: The Role of Enzymes
While natural enzymes from entrails are often sufficient, you can boost and standardize the process by adding external enzymes.
👉 A practical and effective solution:
-
Use digestive enzyme supplements (commonly available on the market)
-
Crush a few tablets and add them to the mix
-
Typical dosage: a few grams per kg of raw material
This significantly:
-
Speeds up hydrolysis
-
Improves consistency
-
Enhances amino acid release
Fermentation vs Predigestion (Important Clarification)
At this stage, it’s important to clarify a concept often misunderstood.
What we are doing here is primarily enzymatic predigestion, not classical fermentation.
👉 I’ve covered this in detail in a dedicated article on the blog (you’ll link it here), where I explain the key differences between fermentation and predigestion, both in biochemical terms and in their impact on bait performance.
Maturation: Where the Real Power Develops
After sealing the container:
-
Let it rest for 3–4 days, then start mixing
-
Stir every 3–4 days
You will observe:
-
Increasing liquid formation
-
Progressive breakdown of fish tissues
👉 Contrary to what many expect:
It should not develop a foul smell.
Minimum and Optimal Maturation Time
-
Minimum usable time: 1 month
-
Optimal performance: beyond 4–8 weeks
-
Long-term stability: over 12 months without issues
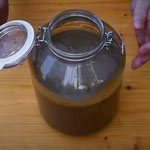
Once fully matured:
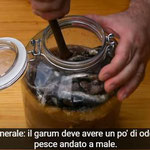
-
Blend everything into a homogeneous liquid
At this point, you have a stable, highly attractive liquid food.
How to Use It in Boilies
Recommended dosage:
-
50–200 ml per kg of dry mix
This liquid provides:
-
Free amino acids
-
Peptides
-
Soluble attractors
-
Natural feeding triggers
All of which are extremely effective for large carp, especially in pressured waters.
What Comes Next… (Don’t Miss This)
From Liquid Gold to Complete Bait System
If you’ve followed the process up to this point, you’re already holding something extremely powerful in your hands: a fully active, enzyme-rich liquid capable of dramatically increasing the attraction profile of any bait.
But stopping here would mean leaving a huge part of its potential untapped.
What many anglers don’t realize is that this liquid is not the final product—it’s actually an intermediate stage used even in industrial processes to produce some of the most effective bait ingredients on the market.
In the bait industry, products like CPSP or Chilean pre-digested fish meals are obtained through processes that start from liquid fish hydrolysates, which are then separated, concentrated, and dried.
In other words, what you’ve just produced at home is conceptually very close to the raw base used in high-end commercial bait production.
Why This Matters (Especially Today)
In recent years, sourcing premium ingredients has become increasingly difficult and expensive.
Since Brexit, many European anglers have experienced:
-
Reduced availability of specialized products
-
Increased costs due to import duties
-
Limited access to niche, high-quality ingredients
As a result, more and more advanced anglers are turning toward self-production, not just as a cost-saving strategy, but as a way to gain full control over bait quality.
And this is exactly where your homemade fish hydrolysate becomes a game changer.
Separating the Fractions: Liquid vs Solid
Once your fermented fish has fully matured and been blended, you can take the process one step further by separating it into two distinct components:
-
A highly concentrated liquid fraction
-
A dense, protein-rich solid fraction
Step 1: Filtration
Use a fine mesh filter bag (like those used in home brewing).
-
Pour the blended mixture into the bag
-
Apply strong pressure by twisting or pressing
You will obtain:
👉 A clear, amber-colored liquid
This is an ultra-concentrated attractor, rich in:
-
Free amino acids
-
Soluble peptides
-
Taste-active compounds
Recommended dosage:
- → 20–40 ml per kg of mix
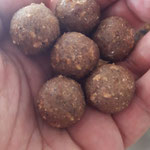
The Solid Fraction: The Foundation of Your Fishmeal
What remains inside the filter bag is a dense paste composed of:
-
Structural proteins
-
Insoluble nutrients
-
Residual fats
This is your raw material for producing homemade pre-digested fishmeal.
From Paste to Powder: Making Your Own Pre-Digested Fishmeal
Step 2: Drying
-
Spread the paste on a tray
-
Maximum thickness: 1 cm
Dry it:
-
In a ventilated, dry environment
-
Or in an oven at 50–60°C (low temperature is critical)
👉 The goal is to preserve nutritional integrity while removing moisture.
Step 3: Milling
Once fully dried:
-
Break the crust into smaller pieces
-
Grind it using:
-
A chopper
-
Or ideally a grain mill
-
You now have a self-made pre-digested fishmeal.
An Alternative Approach
You can also skip filtration and:
-
Dry the entire hydrolysate directly
This results in a product similar to pre-digested LT fishmeal, but personally I strongly prefer separating the fractions to obtain:
-
A dedicated liquid attractor
-
A functional powder
👉 Two tools instead of one.
Nutritional and Functional Value
This homemade ingredient is:
-
Highly digestible
-
Rich in soluble fractions
-
Extremely palatable
And most importantly, it retains a natural biochemical profile often lost in heavily processed industrial products.
Application: A Proven Cold-Water Fishmix
One of the most effective applications is in low-temperature conditions (below 15°C), where digestibility and solubility become critical.
Example Base Mix
-
30% birdfood (e.g. Biskò-type)
-
25% homemade pre-digested fishmeal
-
20% roasted soy flour
-
15% wheat germ
-
10% skimmed milk powder
Liquids Strategy
For 1 kg of mix:
-
40 ml concentrated fish liquid
-
40 ml propylene glycol (to maintain softness and hydration)
-
20 ml pomegranate vinegar (fast acidic attraction, especially in cold water)
-
A fruity acid flavour (half recommended dosage)
-
A small amount of NHDC
Final Thought
What started as a simple preservation technique has evolved into one of the most advanced and effective bait strategies available today.
By mastering this process, you are no longer dependent on the market.
You are producing your own high-performance bait system, tailored, efficient, and incredibly effective.
And that… is a real edge. 🎯
Ready to Take This to a Professional Level?
If this approach resonates with you, then you’re clearly not looking for shortcuts or “ready-made solutions.”
You’re looking for understanding, control, and real performance.
What you’ve just seen in this article is only a small part of what actually happens behind truly effective bait design. The difference between an average bait and a consistently successful one lies in details most anglers never even consider:
-
ingredient functionality
-
biochemical interactions
-
solubility curves
-
digestion dynamics across water temperatures
This is exactly the knowledge I’ve condensed in my book:
👉 Boilies: The Art and Science of Carp Bait
This is not a recipe book.
It’s a technical framework built from years of hands-on experience in both industrial bait development and high-level angling, designed for those who want to:
-
Develop their own bait concepts from scratch
-
Understand why certain ingredients work (and others don’t)
-
Move beyond imitation and start creating a real edge
Inside, you’ll find:
-
Advanced formulation strategies
-
Deep insights into fishmeal, hydrolysates and soluble fractions
-
Practical applications you can immediately translate into your own baits
If you’ve reached this point of the article, you already have the mindset required.
Now it’s just a matter of going deeper.
👉 Download your copy here and start building your own advantage.